Friday, February 20, 2015

PowerSchool Scheduled data export, minimal install

There are several reasons we need to export data from PowerSchool and many times the built-in AutoSend feature will not do.  The AutoSend feature can only export data on active students for either the district or the school, sometimes we need a more specific set of kids as well as the fields that we can pull.

This post will focus on a method that should be able to be run on any Windows 2008 r2 server and above without an extra installs.  It uses PowerShell, .NET 4 and ODP.NET.  Also note that this is what you use once you have your sql query and you just want to set it to run on a schedule to get a .csv or some other delimited file.

I chose this method instead of others because PowerSchool has to be installed on Windows Servers and quite frankly we're a Windows Shop when it comes to servers.  You can run this directly on the server that runs PowerSchool but I chose to use a server we use to warehouse, scrub and analyze a lot of our data.  We also have lots of other servers that run specific applications for transportation/routing, food service, library systems and etc. and all of these are Windows boxes that have the base requirements.

Once I decided this would be my best method I used this post on the Hey, Scripting Guy! Blog to build my basic .ps1 scripts using ODP.NET.  I wasn't as concerned with speed but more the 'simplify' part.  So in summary of what that post talks about is:

  1. ODP.NET  from Oracle 
  2. Make sure you have .Net 4
  3. the ability to run .Net 4 in PowerShell
    • Configure PowerShell to use newer .net.  To do this, you need to create a config file, named PowerShell.Exe.Config according to (http://tfl09.blogspot.com/2010/08/using-newer-versions-of-net-with.html)
  4. bypassing the block (run PowerShell as Admin):  Set-ExecutionPolicy RemoteSigned
  5. run this script by:  .\query1.ps1 

So get ODP.NET:
  1. create a folder called c:/autoexport or somewhere else on your Windows 7+ or 2008r2+ box.
  2. download the proper ODP.NET from Oracle 
  3. extract that in your new folder under another folder called c:/autoexport/odp
Check if you have .NET 4

Configure PowerShell to use newer .NET.  To do this, you need to create a config file, named PowerShell.Exe.Config according to (http://tfl09.blogspot.com/2010/08/using-newer-versions-of-net-with.html),  then put this in the same folder as powershell.exe (%SystemRoot%\system32\WindowsPowerShell\v1.0\powershell.exe)


then bypassing the block (run PowerShell as Admin):
 Set-ExecutionPolicy RemoteSigned

Heres the sample script for Naviance Student import:
To run this in PowerShell you need to do the ol' 'dot slash' in front of the actual script:  ./queryFor_NavianceStudents.ps1

now that you have your delimited export file, you can use PowerShell and WinSCP to upload it.  I'll probably write that part up too soon.

Wrap those up in a .bat file then schedule that with task scheduler!

Custom Alert Icon on Class Attendance page of PowerTeacher

The main goal was to add custom alerts to the class attendance page on PowerTeacher, this page is visited by teachers daily and shows all students in the chosen class in one screen.

Alternatives require a teacher to click through each student on the /teachers/studentpages and also requires customizations be made for each of those pages.

The target page for this post is /teachers/classattendance.html but before we get to that we have first add a custom field for the alert, I just added a boolean field in an advanced DB extension called U_Info and added the column/field named Alert_customalertfield with default value of 0.

Then we need an alert icon, I used a .gif that was basically the favicon.ico of the alert type's website.  But any 16x16 .gif will do, add this to /images so that https://yourPSserver/images/alert_customalert.gif will show.

Next we have to add a place in PowerSchool to check this box, for this we will only allow folks with permission on the admin side to check.  I chose the "Other Information" page for a student on the PowerSchool Admin side.

just add a custom insertion point by adding this code just above the ending /table> tag on /admin/students/misc.html:
Then add this 'page fragment' called "misc.alert_customalert.custom.studentalerts.txt"
with this in it in the same directory as misc.html:
To add this alert icon to the admin side its a simple page fragment called:"title_student_end_css.alert_customalert.student.alert.txt"inserting into: "~[cust.insertion_point:student.alert]"
to do this create a file named "title_student_end_css.alert_customalert.student.alert.txt" in this directory  /wildcards/ with this in it

So to get back to the main goal of this post, adding this to the Class Attendance 'Single Entry' tab, is to add the code below to /teachers/classattendance.html directly after '[alerts]' tag, should be line 245 of the original page. It's not elegant but it does work:
Like I said, it's not elegant and I have not load tested it but it does work in a environment where ~450 teachers login on a daily basis.  It works by using a stored procedure variable called [ccid] that is only available on that page and actually iterates through the listing of students in that class, unfortunately it does not work with a page fragment, for some reason that variable/stored procedure doesn't carry through to the page fragment.  Also other commonly used DATs like ~(studentname) or ~(studentfrn)   don't work.  So I just use a tlist_sql query joining the CC, Students and U_info tables and finding if the student with that [ccid] has a 1 in the customfieldalert, then do a case statement that replaces the value with the html code i want.  Definitely some hackery but like I said it works and teachers are happy.

Wednesday, September 25, 2013

Wireless Baby cam that's portable, costs $100, and securely accessible from any smartphone/tablet

Summary:

The idea is to create a portable, network agnostic wifi baby cam for use at home and traveling.  There are many RF baby video/audio monitors but they are still $100+, limited range and only one viewer, the goal is to create a full functioning WiFi baby cam that when powered on it auto joins a wireless ap (hostapd on pi) which is plugged in via ethernet to a home network and then creates a secure connection (between pi and your home router) so that our pre-configured cam app (iOS or Android) can see the little guy from anywhere.

Assumptions:

Since this does facilitates remote ccess to a home network that is not yours please use responsibly.  To auto configure the phone home secure connection, you will also need to be able plug this in the home network via ethernet and still be within wireless range for the babyCam to connect to the pi.

What you need:

  1. rapsberry pi running a current version of rasbian
  2. rpi set to  get a DHCP  address via ethernet to the guest network
  3. set to auto connect a PPTP session to your home dd-wrt router
  4. wireless usb nic configured to be an access point
  5. foscam wireless IP camera set to auto  connect to t the pi ‘s Hotspot
  6. dd-wrt router v24 or greater (for reverse ssh or pptp and ddns)

resources/inspiration


  • then just NAT port 443 from public to the pi’s PPTP ip on the DD-wrt router

PPTP Server on dd-wrt:

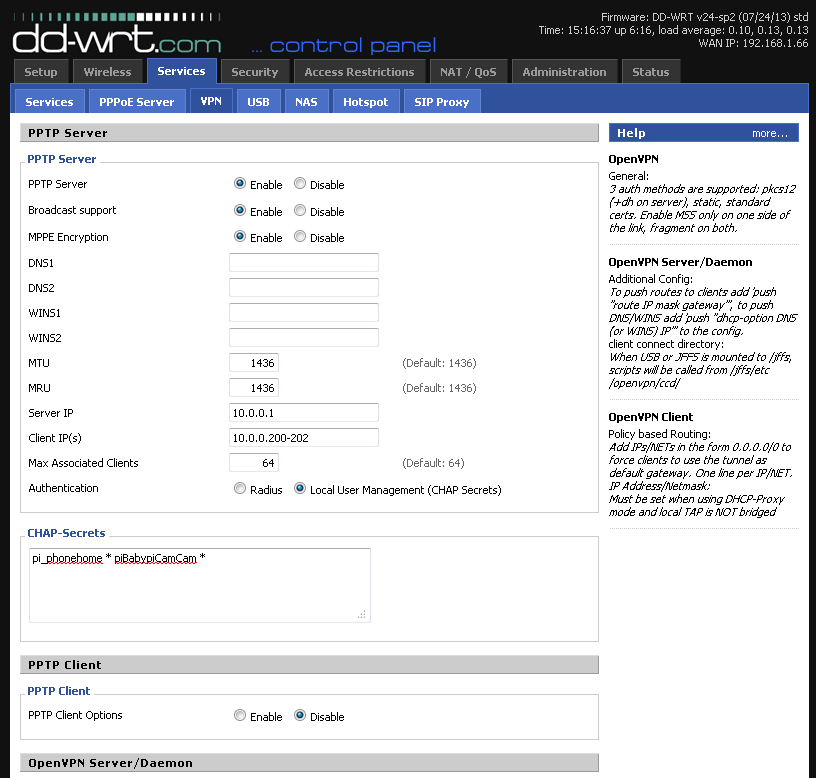
Below is a screenshot of the setup page on dd-wrt, but there are a few gotchas that are good to know so you don’t pull your hair out:
  1. some dd-wrt builds require you to NAT the PPTP port to itself, some don't
  2. some dd-wrt builds PPTP doesn’t work at all, i’ve had best luck with the specific trailed builds, standard and mini and ones that show 1436 as the default MRU/MTU.


CHAP-Secrets: pi_phonehome * pibabypiCamCam *
(username space asterisk space password space asterisk space)

Also you’ll need to allow at least the PPTP port through your Modem NAT’ed to your dd-wrt router.

DDNS on dd-wrt:
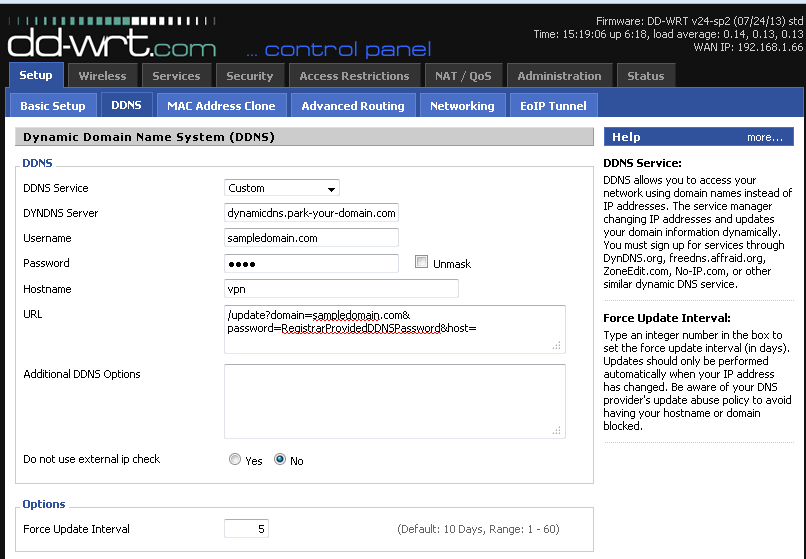
I use namecheap as my registrar so I use the ‘custom’ DDNS option on dd-wrt, but this can easily be done with DynDNS or other freemium options.

in this example the DDNS URL will be: vpn.sampledomain.com


i also updated the hosts file so that when the pi was home it would auto connect there too!

Under servers → services → Additional DNSMasq Options
address=/vpn.sampledomain.com/10.0.0.1

Pi is ssh-able and has Internet

So before we start, you should confirm that you have ssh access to your pi (the easiest way is to plug it in the back of a home router via ethernet, login to the gui and find “raspberry pi” in the DHCP clients, for this example lets say its,192.168.1.22, then just from your favorite ssh terminal “ssh pi@192.168.1.22” This also means it successully gets an IP via DHCP from the home router, yay!

once ssh’ed in, check that it can access the Internet, which I do by checking for updates:
sudo apt-get update
if no error you likely have Internet, might as well go through with update and upgrades
sudo apt-get upgrade

Auto Connect to home dd-wrt router on boot

to keep things simple we might as well set up the secure home connection via PPTP VPN (very useful and simple instructions I used can be found here: http://raspberrypi.stackexchange.com/questions/1679/run-all-online-traffic-through-an-pptp-vpn-connection)

so install it:
sudo apt-get install pptp-linux
create a file in /etc/ppp/peers called ‘home’
sudo nano /etc/ppp/peers/home
paste this in there:
pty "pptp $VPNHOSTNAME --nolaunchpppd --debug"
name $USERNAME
password $PASSWORD
remotename PPTP
require-mppe-128
require-mschap-v2
refuse-eap
refuse-pap
refuse-chap
refuse-mschap
noauth
debug
persist
maxfail 0
defaultroute
replacedefaultroute
usepeerdns
Where $VPNHOSTNAME is your VPN host name, $PASSWORD is your VPN password and $USERNAME is your VPN username.  The first few tests locally just use your dd-wrt router local  IP address as your $VPNHOSTNAME to verify it works, then you can change it to you DDNS hostname to test it from somewhere else on the Internets, like work or your friends house.

in my example:
$VPNHOSTNAM: vpn.sampledomain.com
$USERNAME: pi_phonehome
$PASSWORD: piBabypiCamCam


After you have done that, start it by:
sudo pon /etc/ppp/peers/home
To start your VPN client on boot edit the /etc/network/interfaces file
sudo nano /etc/network/interfaces
and add this section near the bottom:
auto tunnel
iface tunnel inet ppp
       provider home
then restart the PPTP connection
sudo poff home
sudo pon home

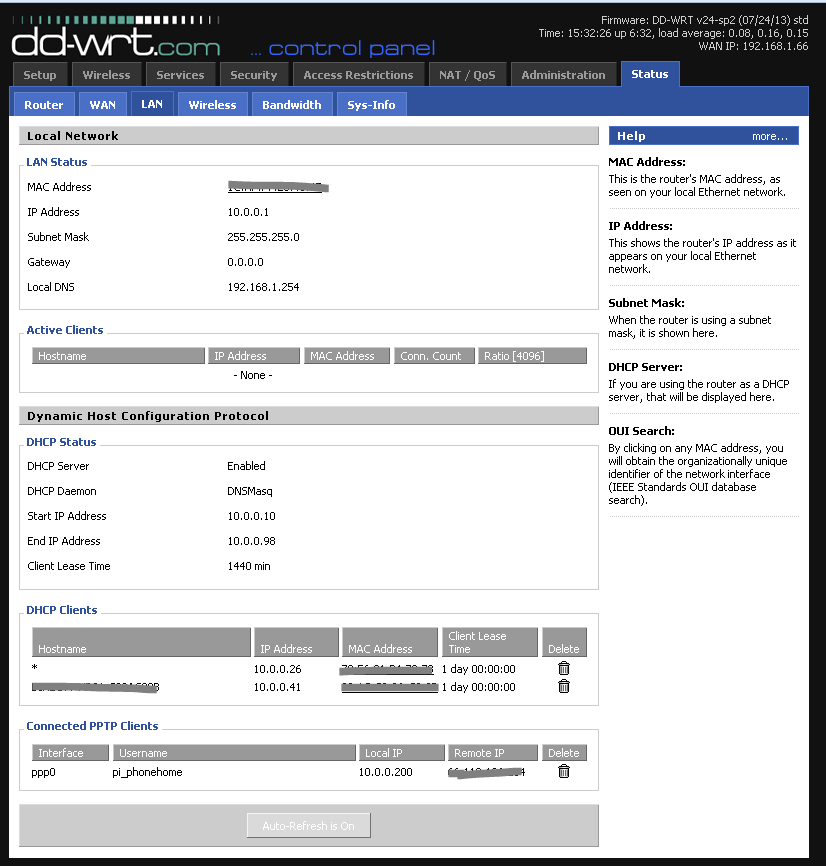
hopefully no errors, to verify go to you home dd-wrt router and click on Status → LAN, at the bottom you should see connected PPTP clients and their respective IPs.

restart the rpi and see if it does what it’s supposed to - Auto PPTP to your router:
sudo reboot

You should be able to plug your rpi via ethernet to any internet connection that allows PPTP VPN passthru, power it up and see if it connected to your home dd-wrt router as a PPTP client, (pro-tip: create a user that is specific to the rpi phoning home so you know for sure, in this case it pi_phonehome)