Summary:
The idea is to create a portable, network agnostic wifi baby cam for use at home and traveling. There are many RF baby video/audio monitors but they are still $100+, limited range and only one viewer, the goal is to create a full functioning WiFi baby cam that when powered on it auto joins a wireless ap (hostapd on pi) which is plugged in via ethernet to a home network and then creates a secure connection (between pi and your home router) so that our pre-configured cam app (iOS or Android) can see the little guy from anywhere.
Assumptions:
Since this does facilitates remote ccess to a home network that is not yours please use responsibly. To auto configure the phone home secure connection, you will also need to be able plug this in the home network via ethernet and still be within wireless range for the babyCam to connect to the pi.
What you need:
- rapsberry pi running a current version of rasbian
- rpi set to get a DHCP address via ethernet to the guest network
- set to auto connect a PPTP session to your home dd-wrt router
- wireless usb nic configured to be an access point
- foscam wireless IP camera set to auto connect to t the pi ‘s Hotspot
- dd-wrt router v24 or greater (for reverse ssh or pptp and ddns)
resources/inspiration
- auto pptp home
- create hotspot on pi
- Configure the foscam to be statically IP’ed when connecting to the pi’s hotspot
- nginx reverse proxy for web cams
- then just NAT port 443 from public to the pi’s PPTP ip on the DD-wrt router
PPTP Server on dd-wrt:
Below is a screenshot of the setup page on dd-wrt, but there are a few gotchas that are good to know so you don’t pull your hair out:
- some dd-wrt builds require you to NAT the PPTP port to itself, some don't
- some dd-wrt builds PPTP doesn’t work at all, i’ve had best luck with the specific trailed builds, standard and mini and ones that show 1436 as the default MRU/MTU.
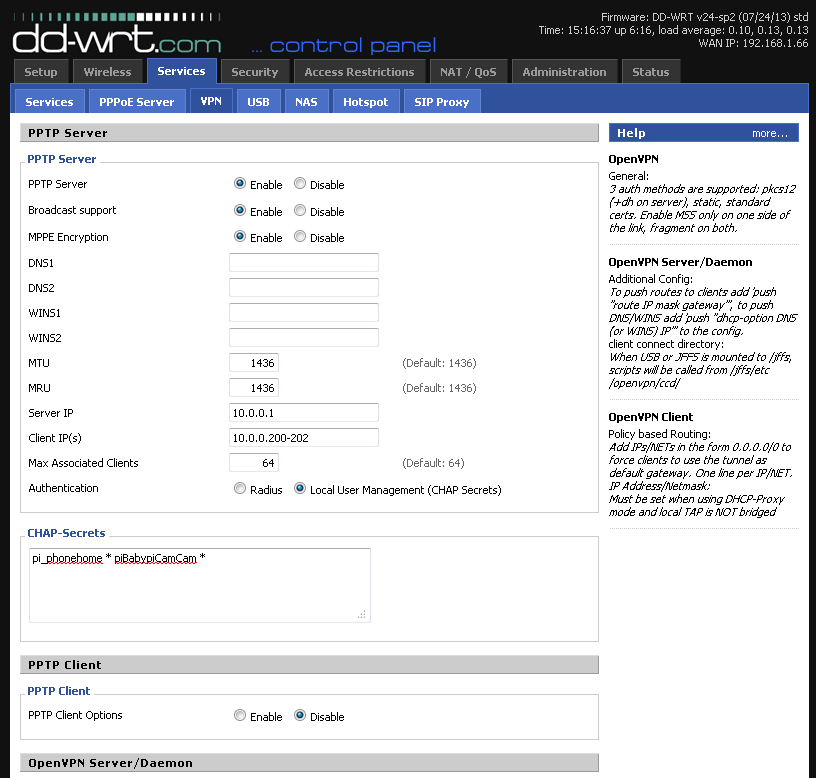
CHAP-Secrets: pi_phonehome * pibabypiCamCam *
(username space asterisk space password space asterisk space)
Also you’ll need to allow at least the PPTP port through your Modem NAT’ed to your dd-wrt router.
DDNS on dd-wrt:
I use namecheap as my registrar so I use the ‘custom’ DDNS option on dd-wrt, but this can easily be done with DynDNS or other freemium options.
in this example the DDNS URL will be: vpn.sampledomain.com
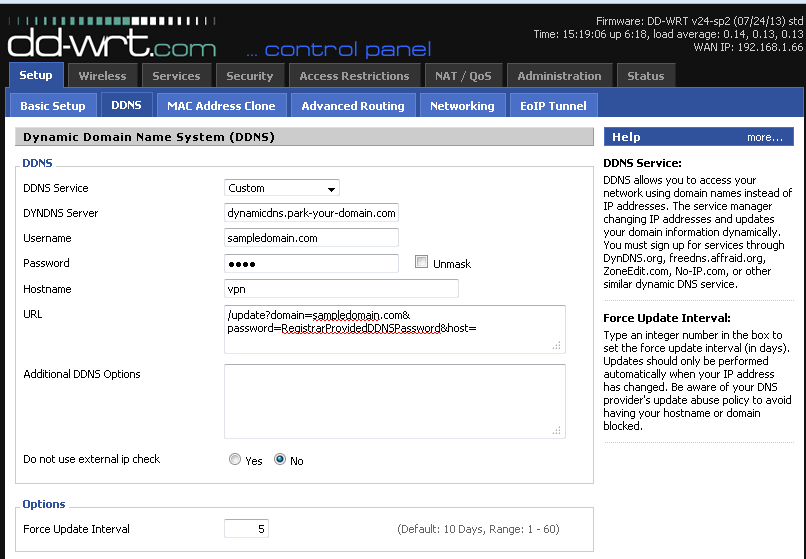
i also updated the hosts file so that when the pi was home it would auto connect there too!
Under servers → services → Additional DNSMasq Options
address=/vpn.sampledomain.com/10.0.0.1

Pi is ssh-able and has Internet
So before we start, you should confirm that you have ssh access to your pi (the easiest way is to plug it in the back of a home router via ethernet, login to the gui and find “raspberry pi” in the DHCP clients, for this example lets say its,192.168.1.22, then just from your favorite ssh terminal “ssh pi@192.168.1.22” This also means it successully gets an IP via DHCP from the home router, yay!
once ssh’ed in, check that it can access the Internet, which I do by checking for updates:
sudo apt-get update
if no error you likely have Internet, might as well go through with update and upgrades
sudo apt-get upgrade
Auto Connect to home dd-wrt router on boot
to keep things simple we might as well set up the secure home connection via PPTP VPN (very useful and simple instructions I used can be found here: http://raspberrypi.stackexchange.com/questions/1679/run-all-online-traffic-through-an-pptp-vpn-connection)
so install it:
sudo apt-get install pptp-linux
create a file in /etc/ppp/peers called ‘home’
create a file in /etc/ppp/peers called ‘home’
sudo nano /etc/ppp/peers/home
paste this in there:
pty "pptp $VPNHOSTNAME --nolaunchpppd --debug"
name $USERNAME
password $PASSWORD
remotename PPTP
require-mppe-128
require-mschap-v2
refuse-eap
refuse-pap
refuse-chap
refuse-mschap
noauth
debug
persist
maxfail 0
defaultroute
replacedefaultroute
usepeerdns
name $USERNAME
password $PASSWORD
remotename PPTP
require-mppe-128
require-mschap-v2
refuse-eap
refuse-pap
refuse-chap
refuse-mschap
noauth
debug
persist
maxfail 0
defaultroute
replacedefaultroute
usepeerdns
Where $VPNHOSTNAME is your VPN host name, $PASSWORD is your VPN password and $USERNAME is your VPN username. The first few tests locally just use your dd-wrt router local IP address as your $VPNHOSTNAME to verify it works, then you can change it to you DDNS hostname to test it from somewhere else on the Internets, like work or your friends house.
in my example:
$VPNHOSTNAM: vpn.sampledomain.com
$USERNAME: pi_phonehome
$PASSWORD: piBabypiCamCam
After you have done that, start it by:
sudo pon /etc/ppp/peers/home
To start your VPN client on boot edit the /etc/network/interfaces file
sudo nano /etc/network/interfaces
and add this section near the bottom:
auto tunnel
iface tunnel inet ppp
provider home
|
then restart the PPTP connection
sudo poff home
sudo pon home
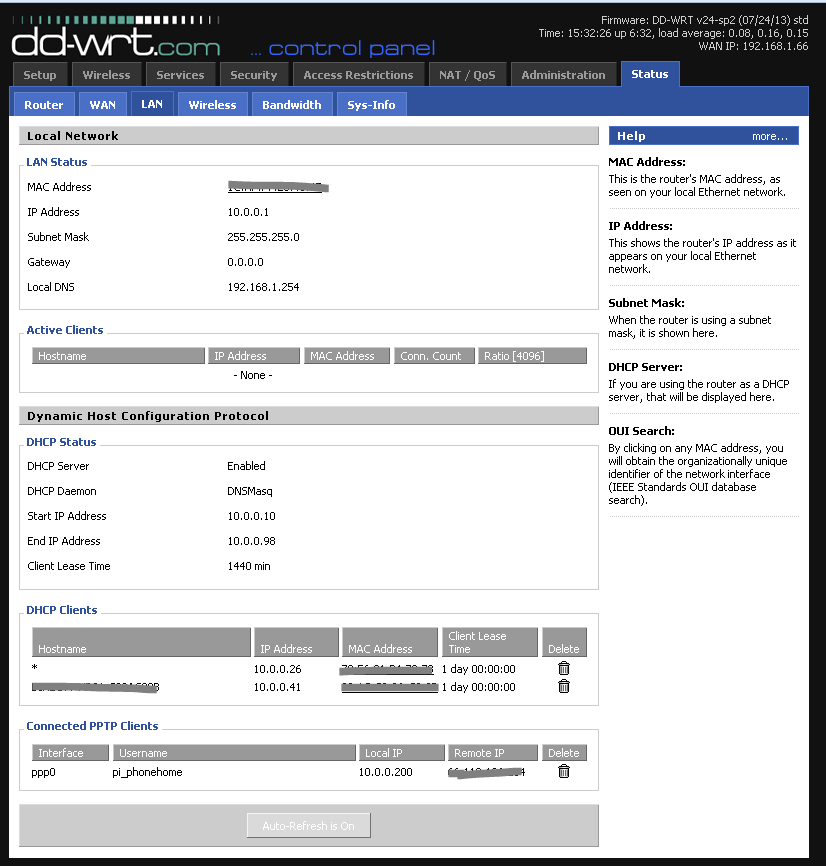
hopefully no errors, to verify go to you home dd-wrt router and click on Status → LAN, at the bottom you should see connected PPTP clients and their respective IPs.
restart the rpi and see if it does what it’s supposed to - Auto PPTP to your router:
sudo reboot
You should be able to plug your rpi via ethernet to any internet connection that allows PPTP VPN passthru, power it up and see if it connected to your home dd-wrt router as a PPTP client, (pro-tip: create a user that is specific to the rpi phoning home so you know for sure, in this case it pi_phonehome)