Summary:
The idea is to create a portable, network agnostic wifi baby cam for use at home and traveling. There are many RF baby video/audio monitors but they are still $100+, limited range and only one viewer, the goal is to create a full functioning WiFi baby cam that when powered on it auto joins a wireless ap (hostapd on pi) which is plugged in via ethernet to a home network and then creates a secure connection (between pi and your home router) so that our pre-configured cam app (iOS or Android) can see the little guy from anywhere.
Assumptions:
Since this does facilitates remote ccess to a home network that is not yours please use responsibly. To auto configure the phone home secure connection, you will also need to be able plug this in the home network via ethernet and still be within wireless range for the babyCam to connect to the pi.
What you need:
- rapsberry pi running a current version of rasbian
- rpi set to get a DHCP address via ethernet to the guest network
- set to auto connect a PPTP session to your home dd-wrt router
- wireless usb nic configured to be an access point
- foscam wireless IP camera set to auto connect to t the pi ‘s Hotspot
- dd-wrt router v24 or greater (for reverse ssh or pptp and ddns)
resources/inspiration
- auto pptp home
- create hotspot on pi
- Configure the foscam to be statically IP’ed when connecting to the pi’s hotspot
- nginx reverse proxy for web cams
- then just NAT port 443 from public to the pi’s PPTP ip on the DD-wrt router
PPTP Server on dd-wrt:
Below is a screenshot of the setup page on dd-wrt, but there are a few gotchas that are good to know so you don’t pull your hair out:
- some dd-wrt builds require you to NAT the PPTP port to itself, some don't
- some dd-wrt builds PPTP doesn’t work at all, i’ve had best luck with the specific trailed builds, standard and mini and ones that show 1436 as the default MRU/MTU.
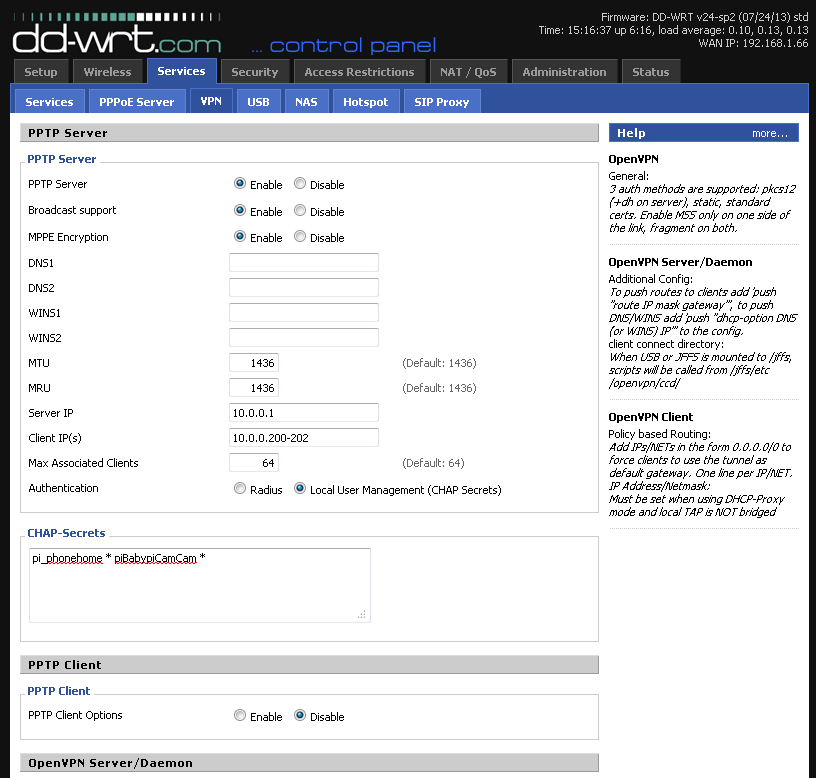
CHAP-Secrets: pi_phonehome * pibabypiCamCam *
(username space asterisk space password space asterisk space)
Also you’ll need to allow at least the PPTP port through your Modem NAT’ed to your dd-wrt router.
DDNS on dd-wrt:
I use namecheap as my registrar so I use the ‘custom’ DDNS option on dd-wrt, but this can easily be done with DynDNS or other freemium options.
in this example the DDNS URL will be: vpn.sampledomain.com
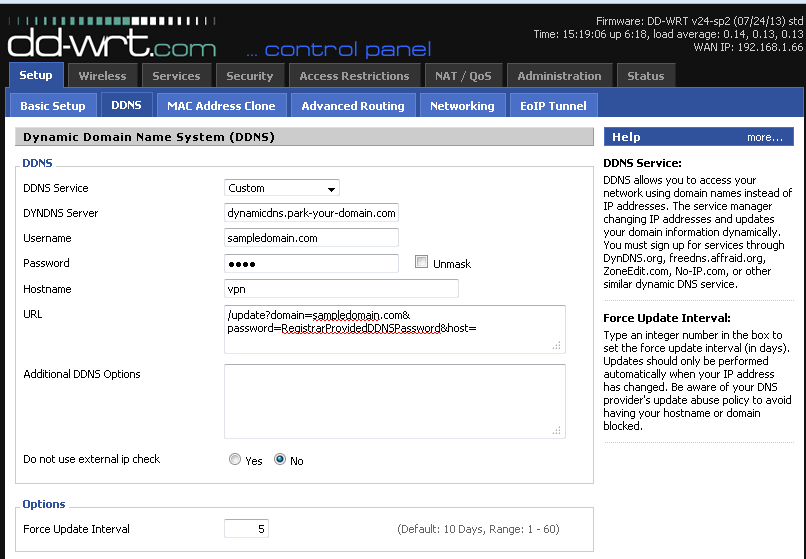
i also updated the hosts file so that when the pi was home it would auto connect there too!
Under servers → services → Additional DNSMasq Options
address=/vpn.sampledomain.com/10.0.0.1

Pi is ssh-able and has Internet
So before we start, you should confirm that you have ssh access to your pi (the easiest way is to plug it in the back of a home router via ethernet, login to the gui and find “raspberry pi” in the DHCP clients, for this example lets say its,192.168.1.22, then just from your favorite ssh terminal “ssh pi@192.168.1.22” This also means it successully gets an IP via DHCP from the home router, yay!
once ssh’ed in, check that it can access the Internet, which I do by checking for updates:
sudo apt-get update
if no error you likely have Internet, might as well go through with update and upgrades
sudo apt-get upgrade
Auto Connect to home dd-wrt router on boot
to keep things simple we might as well set up the secure home connection via PPTP VPN (very useful and simple instructions I used can be found here: http://raspberrypi.stackexchange.com/questions/1679/run-all-online-traffic-through-an-pptp-vpn-connection)
so install it:
sudo apt-get install pptp-linux
create a file in /etc/ppp/peers called ‘home’
create a file in /etc/ppp/peers called ‘home’
sudo nano /etc/ppp/peers/home
paste this in there:
pty "pptp $VPNHOSTNAME --nolaunchpppd --debug"
name $USERNAME
password $PASSWORD
remotename PPTP
require-mppe-128
require-mschap-v2
refuse-eap
refuse-pap
refuse-chap
refuse-mschap
noauth
debug
persist
maxfail 0
defaultroute
replacedefaultroute
usepeerdns
name $USERNAME
password $PASSWORD
remotename PPTP
require-mppe-128
require-mschap-v2
refuse-eap
refuse-pap
refuse-chap
refuse-mschap
noauth
debug
persist
maxfail 0
defaultroute
replacedefaultroute
usepeerdns
Where $VPNHOSTNAME is your VPN host name, $PASSWORD is your VPN password and $USERNAME is your VPN username. The first few tests locally just use your dd-wrt router local IP address as your $VPNHOSTNAME to verify it works, then you can change it to you DDNS hostname to test it from somewhere else on the Internets, like work or your friends house.
in my example:
$VPNHOSTNAM: vpn.sampledomain.com
$USERNAME: pi_phonehome
$PASSWORD: piBabypiCamCam
After you have done that, start it by:
sudo pon /etc/ppp/peers/home
To start your VPN client on boot edit the /etc/network/interfaces file
sudo nano /etc/network/interfaces
and add this section near the bottom:
auto tunnel
iface tunnel inet ppp
provider home
|
then restart the PPTP connection
sudo poff home
sudo pon home
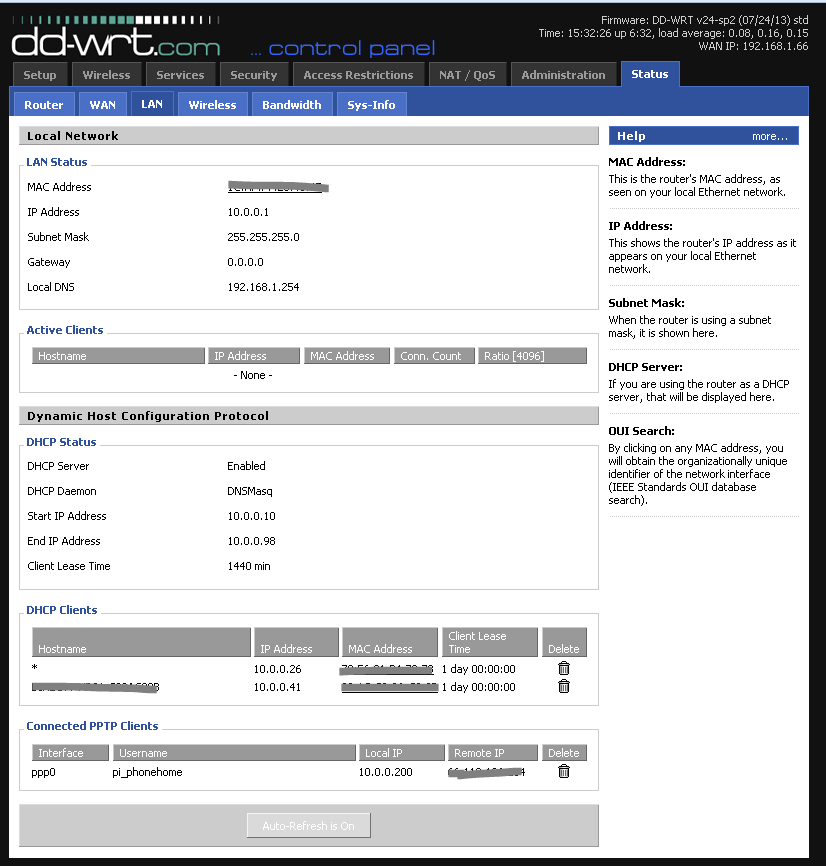
hopefully no errors, to verify go to you home dd-wrt router and click on Status → LAN, at the bottom you should see connected PPTP clients and their respective IPs.
restart the rpi and see if it does what it’s supposed to - Auto PPTP to your router:
sudo reboot
You should be able to plug your rpi via ethernet to any internet connection that allows PPTP VPN passthru, power it up and see if it connected to your home dd-wrt router as a PPTP client, (pro-tip: create a user that is specific to the rpi phoning home so you know for sure, in this case it pi_phonehome)
- you’ll need a usb wireless nic - i used Edimax EW-7811Un but it might be good to buy adafruits
- Plug the usb wireless nic in while the rpi is off so it doesn’t cause a power surge.
You can just follow their instructions, word for word
- http://learn.adafruit.com/setting-up-a-raspberry-pi-as-a-wifi-access-point/install-software
- then come back when that's done.
- one thing I noticed is that if I unplug the usb WiFi NIC, I have to reassign the IP to the WLAN0
- Assign a static IP address to the wifi adapter by runningsudo ifconfig wlan0 192.168.42.1
Statically IP Wireless IP camera to rpi’s new Hotspot
basically just hook the Wireless IP cam up via ethernet to your home router, grab the IP or use their utility, go to the Web Interface and setup the Wireless Network settings to be statically in the scope of the rpi hotspot. It should be static for the next step on the reverse proxy using ngix.
nginx reverse proxy for web cams
What will you need before starting:
- Your security cameras setup with static IP addresses.
- Your router setup to forward port 443 to the static IP of your Raspberry Pi’s PPTP address on the router.
Finally to view the video on my cameras I use the following url(s)
- https://exampleurl.dnsdynamic.com/cam1/ for camera one
for the examples that follow you can assume that the cameras have the following static IP addresses and ports:
192.168.42.10:6474 camera one (the IP of the camera wirelessly conntected to the rpi new Hotspot from the previous step)
Make a backup folder for all of the files you are about to modify
sudo mkdir /home/pi/backupfiles
Make a backup of your interfaces file
sudo cp /etc/network/interfaces /home/pi/backupfiles/interfaces.backup
Create your self signed SSL certificates
Make a directory for the certificates
sudo mkdir /home/pi/certificates
Navigate to that directory
cd /home/pi/certificates
Generate the private key
sudo openssl genrsa -des3 -out exampleurl.dnsdynamic.com.key 2048
-- you will be prompted (twice) for a password for the key do not forget it
Generate the Certificate Signing Request
sudo openssl req -new -key exampleurl.dnsdynamic.com.key -out exampleurl.dnsdynamic.com.csr
-- at the prompts feel free to either enter values or simply press the enter key to accept the shown default value.
Generate the self signed certificate (good for 12 years)
sudo openssl x509 -req -days 4380 -in exampleurl.dnsdynamic.com.csr -signkey exampleurl.dnsdynamic.com.key -out exampleurl.dnsdynamic.com.crt
-- you will be prompted for the private key password
Generate a key that does not have a password
sudo openssl rsa -in exampleurl.dnsdynamic.com.key -out exampleurl.dnsdynamic.com.unsecure.key
Install nginx
sudo apt-get install nginx
Make a backup of the nginx config file
sudo cp /etc/nginx/sites-enabled/default /home/pi/backupfiles/nginx.default.backup
Edit the nginx config
sudo nano /etc/nginx/sites-enabled/default
Add the following lines near the top of the server section
listen 443;
ssl on;
ssl_certificate /home/pi/certificates/exampleurl.dnsdynamic.com.crt;
ssl_certificate_key /home/pi/certificates/exampleurl.dnsdynamic.com.unsecure.key;
location /cam1/ {
proxy_pass http://192.168.42.10:6474/;
proxy_redirect off;
proxy_set_header Host $host:$server_port;
proxy_set_header X-Real-IP $remote_addr;
}
change the server_name from localhost to your domain name
server_name exampleurl.dnsdynamic.com;
Save the file and see if you made any mistakes by reloading nginx
sudo service nginx reload
If no errors reboot
sudo shutdown -r now
so now you should be able to go https://vpn.sampledomain.comL/cam1 from most current browsers.
If you want this to work from iOS or Android Apps, they don't usually allow directories for cams so you can just set up two "servers" in nginx to listen on both ports 8080 and 443 and still proxy to the same camera, and only NAT 443 from the outside world. You could also have multiple cam related DDNS for multiple cams and have ngnix proxy them based on url requested.
I noticed there can be quite a delay depending on number of connections when everything is accessed remotely (ie smartphone using cellular and the rpi and camera are also offsite) but it its just one connection the delay is a second or two. Of course there are many variables like your home's up-link speed and where ever the rpi is and that network's up-link speed is. I'll try to address those in a future post, there's definitely room for improvement but i wanted to make this with the least amount of pieces and cheapest.
$9 usb WiFi (amazon)
$0 micro usb and usb wall plug (i had these from old phones)
$54 foscam fi8909w (amazon)
server {
listen 443;
ssl on;
ssl_certificate /home/pi/certificates/exampleurl.dnsdynamic.com.crt;
ssl_certificate_key /home/pi/certificates/exampleurl.dnsdynamic.com.unsecure.key;
location / {
proxy_pass http://192.168.42.10:6474/;
proxy_redirect off;
proxy_set_header Host $host:$server_port;
proxy_set_header X-Real-IP $remote_addr;
}
}
server {
listen 8080;
location / {
proxy_pass http://192.168.42.10:6474/;
proxy_redirect off;
proxy_set_header Host $host:$server_port;
proxy_set_header X-Real-IP $remote_addr;
}
}
I was able to get this working for the browser interface on iOS, Android and all browsers on Mac/Win. However I was only able to get it to work from the Cam app tiny Cam Monitor Pro on Android, using both SSL and non SSL (which applies for both local and remote) so you'll have to choose one setting. For some reason the iOS app Foscam PRO crashes when trying to connect to the rpi's ngix proxy on port 80 or 8080. But you can easily just bookmark the link on the desktop and works pretty well.
other notes:
I noticed there can be quite a delay depending on number of connections when everything is accessed remotely (ie smartphone using cellular and the rpi and camera are also offsite) but it its just one connection the delay is a second or two. Of course there are many variables like your home's up-link speed and where ever the rpi is and that network's up-link speed is. I'll try to address those in a future post, there's definitely room for improvement but i wanted to make this with the least amount of pieces and cheapest.total cost - $103
$35 rpi$9 usb WiFi (amazon)
$0 micro usb and usb wall plug (i had these from old phones)
$54 foscam fi8909w (amazon)
Not sure you can really throw in the cost of the dd-wrt router since it also serves its main role at the house as a typical WiFi router. otherwise $30 refurbished DD-WRT able router (amazon)
other resources:
auto ssh home (reverse tunnel)
No comments:
Post a Comment